
112 lines
6.9 KiB
Markdown
112 lines
6.9 KiB
Markdown
My own version "from scratch" of a self-rescaling CFG / anti-burn. It ain't much but it's honest work.
|
|
|
|
## Last update:
|
|
- Allows unpatch `turn off the negative` by removing or disconnecting the node
|
|
- added the "Warp drive" node. It uses a new method of my own cooking which uses the previous step to determin a negative. Cutting the generation time by half for approx 3/4 of the steps.
|
|
- added example workflows with 10-12 steps but of course you can do more steps if needed. It is not a goal to do less steps in general but also to show it is compatible.
|
|
|
|
# In short:
|
|
|
|
No more burns and 160% faster gens with the warp drive node.
|
|
|
|
# Usage:
|
|
|
|
|
|
|
|
|
|
### That's it!
|
|
|
|
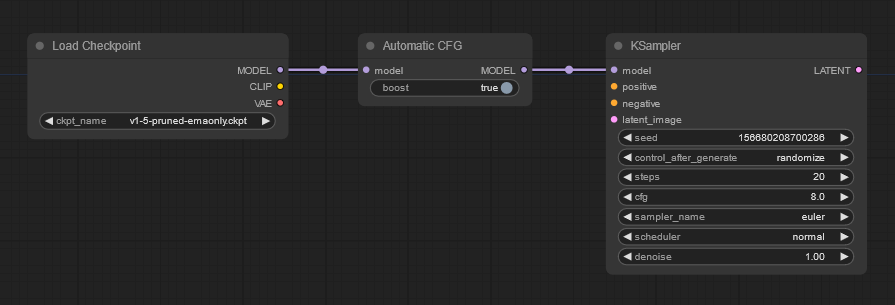
- The "boost" toggle will turn off the negative guidance when the sigmas are near 1. This doubles the inference speed. ~~**To unpatch the function you have to start a batch with the toggle off.** Removing/disconnecting the node will not do it.~~
|
|
- The negative strength lerp the cond and uncond. Now in normal times the way I do this would burn things to the ground. But since it is initialy an anti-burn it just works. This idea is inspired by the [negative prompt weight](https://github.com/muerrilla/stable-diffusion-NPW) repository.
|
|
- I leave the advanced node for those who are interested. It will not be beneficial to those who do not feel like experimenting.
|
|
|
|
For 100 steps this is where the sigma are reaching 1:
|
|
|
|

|
|
|
|
Note: the warp drive node improves the speed a lot more. The average speed is 160% the normal one if used with the AYS scheduler (check the workflow images).
|
|
|
|
There seem to be a slight improvement in quality when using the boost with my other node [CLIP Vector Sculptor text encode](https://github.com/Extraltodeus/Vector_Sculptor_ComfyUI) using the "mean" normalization option.
|
|
|
|
# Just a note:
|
|
|
|
Your CFG won't be your CFG anymore. It is turned into a way to guide the CFG/final intensity/brightness/saturation. So don't hesitate to change your habits while trying!
|
|
|
|
# The rest of the explaination:
|
|
|
|
While this node is connected, this will turn your sampler's CFG scale into something else.
|
|
This methods works by rescaling the CFG at each step by evaluating the potential average min/max values. Aiming at a desired output intensity (by intensity I mean overall brightness/saturation/sharpness).
|
|
The base intensity has been arbitrarily chosen by me and your sampler's CFG scale will make this target vary.
|
|
I have set the "central" CFG at 8. Meaning that at 4 you will aim at half of the desired range while at 16 it will be doubled. This makes it feel slightly like the usual when you're around the normal values.
|
|
|
|
The CFG behavior during the sampling being automatically set for each channel makes it behave differently and therefores gives different outputs than the usual.
|
|
From my observations by printing the results while testing, it seems to be going from around 16 at the beginning, to something like 4 near the middle and ends up near ~7.
|
|
These values might have changed since I've done a thousand tests with different ways but that's to give you an idea, it's just me eyeballing the CLI's output.
|
|
|
|
I use the upper and lower 25% topk mean value as a reference to have some margin of manoeuver.
|
|
|
|
It makes the sampling generate overall better quality images. I get much less if not any artifacts anymore and my more creative prompts also tends to give more random, in a good way, different results.
|
|
|
|
I attribute this more random yet positive behavior to the fact that it seems to be starting high and then since it becomes lower, it self-corrects and improvise, taking advantage of the sampling process a lot more.
|
|
|
|
It is dead simple to use and made sampling more fun from my perspective :)
|
|
|
|
You will find it in the model_patches category.
|
|
|
|
TLDR: set your CFG at 8 to try it. No burned images and artifacts anymore. CFG is also a bit more sensitive because it's a proportion around 8.
|
|
|
|
Low scale like 4 also gives really nice results since your CFG is not the CFG anymore.
|
|
|
|
# Updates:
|
|
|
|
Updated:
|
|
- Up to 28.5% faster generation speed than normal
|
|
- Negative weighting
|
|
|
|
05.04.24:
|
|
|
|
- Updated to latest ComfyUI version. If you get an error: update your ComfyUI
|
|
|
|
15.04.24
|
|
|
|
- Added "no uncond" node which completely disable the negative and doubles the speed while rescaling the latent space in the post-cfg function up until the sigmas are at 1 (or really, 6.86%). By itself it is not perfect and I'm searching for solutions to improve the final result. It seems to work better with dpmpp3m_sde/exponential if you're not using anything else. If you are using the PAG node then you don't need to care about the sampler but will generate at a normal speed. Result will be simply different (I personally like them).
|
|
- To use the [PAG node](https://github.com/pamparamm/sd-perturbed-attention/tree/master) ~~without the complete slow-down (if using the no-uncond node) or at least take advantage of the boost feature:~~
|
|
~~- in the "pag_nodes.py" file look for "disable_cfg1_optimization=True"~~
|
|
~~- set it to "disable_cfg1_optimization=False".~~ This is not necessary anymore because the dev modified it already :)
|
|
- For the negative lerp function in the other nodes the scale has been divided by two. So if you were using it at 10, set it to 5.
|
|
|
|
16.04.24
|
|
|
|
- Added "uncond_start_percentage" as an experimental feature. This allows to start the guidance later as a way to try [Applying Guidance in a Limited Interval Improves
|
|
Sample and Distribution Quality in Diffusion Models](https://arxiv.org/pdf/2404.07724.pdf). A more accurate implementation [can be found here](https://github.com/ericbeyer/guidance_interval) :)
|
|
|
|
17.04.24
|
|
|
|
- reworked the advanced node and cleaned up
|
|
- added timing on every options
|
|
- add a post-rescale node which allows to fight deep-frying images a bit more forr some special cases
|
|
- added a tweaked version of the Comfy SAG node with start/end sliders
|
|
- changed start/end sliders, they are related directly to the sigma values and not in percentage anymore. ⚠
|
|
|
|
01.05.24
|
|
|
|
- Actually working disabled uncond
|
|
- Added "warp drive" preset to test it out simply.
|
|
|
|
03.05.24
|
|
|
|
- Allows unpatch `turn off the negative` by removing or disconnecting the node.
|
|
|
|
# 10 steps with only 2 having the negative enabled. So ~170% faster. 2.5 seconds on a RTX4070
|
|
|
|

|
|
|
|
# cherry-picked 24 steps uncond fully disabled (these images are also workflows):
|
|
|
|
|
|

|
|
|
|

|
|
|
|

|